Showing posts with label dessert. Show all posts

Friday, February 27, 2015

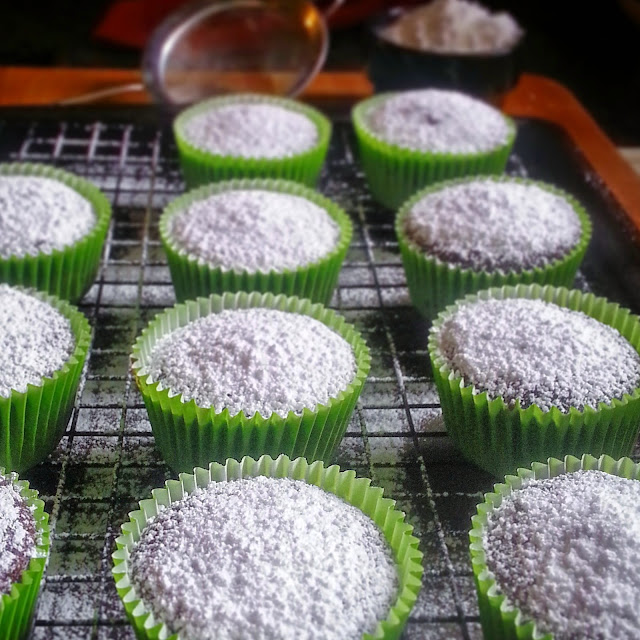
Simple chocolate cupcakes

 I love those days where you wake up and the sun is shining and the birds are singing with glorious abandon. This morning was not one of those mornings. It is cold, gloomy and drizzling outside. However, a few days ago I woke up and it was an absolutely beautiful day. I opened up the windows in the house and let the fresh air in. I did a little house cleaning and clothes washing.
All of this cleaning got me a little hungry and I was also a little inspired to bake something yummy and sweet. I am trying to consume less sugar for obvious reasons but also because I have a cute little dress and a swimsuit that I need to fit into in a few months and I have to bake less or just find ways to bake a little more healthy.
So I decided to make some cupcakes.
Chocolate Cupcakes!!!
I don't like to use box mixes because they are usually full of unnecessary crap and are not very healthy, but I happened to have one on hand.
So, I made some chocolate mix and used applesauce instead of the oil to make it a little healthier and I also used farm fresh cage-free eggs. I used these green Wilton cupcake holders and unfortunately they stuck to my cupcakes really bad, but they sure looked purdy!
Then, I sprinkled a generous coating of confectioners sugar all over them.
I think they came out great and I realized that I love chocolate cupcakes with just a touch of sugar and not a heaping layer of icing. Not that I won't still thrown down on some big ole icing covered cupcakes, but It is a nice change to enjoy a simple rich chocolate cupcake.
 
Blessings to all
 

Sunday, December 21, 2014

Cinnamon Rolls from Heaven


I always wanted to make cinnamon rolls from scratch but was a little intimidated with the task. The amount of time that I thought would have to go into making those gooey little buns was daunting. I put it on my list of things I want to learn to make from scratch and kind of forgot about it. That was until I came across this recipe that seemed too good to be true. There was an easy video tutorial to follow along with and everything. Score! I really like the lady who made the video. Her name is Jenny. She's a pretty woman, probably in her 60's, quirky, blonde and for some reason seems so familiar to me. You want to know why this woman seemed so familiar to me? 
Because she is Jenny Jones.


The former talk show host Jenny Jones. I learned how to make some of the tastiest and easiest cinnamon rolls ever from a former 80's & 90's drama talk show host. I didn't even know she had a youtube cooking channel. Did you know? I think I like her better as a cooking show host than the other.

After I stopped saying, "No wonder she looks so good, It's Jenny Jones" then I was able to focus on making these yummy buttery rolls. Not only is this recipe fairly easy to execute but she has cut out about half the butter and sugar of your regular cinnamon rolls. I would have made them and totally enjoyed them even if she had doubled the butter and sugar, but I honestly was just as satisfied with these and can't complain. I don't think you will notice either. Just think of it as a gift to yourself.

To make it a little easier I have gone ahead and laid out the basic tools and ingredients that you will need to make these fabulous ooey gooey sticky sweet rolls but I think you will find it most helpful to follow her 15 minute instructional video to get the full grasp on what is supposed to go down. Besides, you need to go see Jenny Jones do a cooking show. It is wonderful. Actually I find her very relaxing and kind of funny. Especially now that I know who this random Jenny Can Cook gal is.

What you will need:
TOOLS
Stand Mixer (works the best)
Measuring cups and spoons
large bowl
silicone spatula
8" round baking pan
Floss if you got it (or large knife)
plastic wrap
rolling pin

Ingredients
DOUGH
1 1/2 c. Flour + 1/4 c additional flous
1/4 c. sugar
1/2 tsp. salt
1 pkg yeast
1/2 c. warm milk
3 tbsp. Canola Oil
1 egg

FILLING
1/4 c. Brown sugar
2 tsp. Cinnamon

GLAZE
1 c. Confectioners Sugar
1/4 tsp. Vanilla Extract
2 tbsp. Milk
milk

*I added 2 tbsp. cream cheese and 1 tbsp. of butter to my icing. What can I say? I love a rich creamy cream cheese frosting. Just a suggestion!


You can find the recipe and video tutorial here and watch how easy it is to make these big, yummy, fluffy cinnamon rolls all by yourself. I would watch the video once all the way through and take it all in. Then, you can prepare everything and when you are ready you can follow along with the video again while you are actually making them. I hope you get the opportunity to check out the video and Jenny as well as try out this recipe. It is a great one. Enjoy your journey in the kitchen. If you're not having fun then you are not doing it right.

Blessing to all


Sunday, December 14, 2014

Pretty Petit Fours

These little Alice in Wonderland inspired petit fours are so light, airy and delicious. They literally melt in your mouth. Ok, so before you get too excited about this, I don't have a recipe ready for these delicious little tea cakes. I just love them so much that I wanted to share them and could not wait any longer. I will of course try to get one together.

I remember watching Alice in Wonderland when I was a little kid and seeing Alice eat that precious little blue round cake that said, "Eat Me" on it. I was like, "I want a bite" lol. Then she grew like 20 feet tall and broke through the roof. But I still loved the way that lovely little bite sized cake was stored perfectly in that little glass box and it all just seemed so magical.

I have also always loved petit fours and tea cakes and wanted to make my own. I have attempted making petit fours a couple of times before and they can be a little tricky. I will say that what worked best for me was making a large sheet cake and using a small round cookie cutter to cut out the little cakes. Then I used a light glaze and smothered them over a grated cookie rack.

My favorite part about making sweets like this is the creativity that happens. It is like food art.
IT IS Food Art!
I love food and I love art. It is a win win. I have been passionate about food and art since I was very young. So to get to combine the two is really fun for me. I like to write inspirational sayings on my food sometimes too. Like Love. I write that one a lot, lol.

I will do my best to get a recipe together for these as soon as possible. Let these be inspiration as to little cakes to come. As always, Enjoy your journey in the kitchen. The more you practice, the more you learn. It is a blast either way.

Blessings to all


Tuesday, July 8, 2014

Cheesecake Truffles

We all love truffles and most of us seem to be in love with cheesecake. Well what if you could get a truffle made of cheesecake? Yes! Your dreams are coming true. You can! You can have a sweet and tangy, creamy filled little white chocolate coated bite sized balls of heaven. You can breathe now and put your tongue back in your mouth. Just wait to taste these wonderful creations. 

I won't go on and on with any useless tips, education or info. I know you want to get started and get one of these things in your mouth. So I won't make you wait any longer.

What you will need:
Gadgets:
Large mixing bowl
Rubber or silicone spatula
Mixer/Beater/Muscles and whisk
9" Springform pan
Baking sheet
Measuring Cups
Measuring Spoons
3 - 5 bowls for toppings
parchment paper
nonstick cooking spray

Ingredients:
3 - 8oz packages Cream Cheese, softened
1 cup sugar
3 Large Eggs
1 tbsp. Vanilla extract
1 cup Sour cream
1 pkg (12oz)White Chocolate Chips
1 cup Graham Cracker Crumbs (I used Biscoff Lotus cookies. You know the ones you get on the plane) It just adds a little something extra!!!
2 Tbsp. Shortening
Various decorations and/or toppings: sprinkles, chopped nuts, grated coconut, grated chocolate, sifted cocoa powder

Directions:
Preheat oven to 350 degrees.

Line the bottom of your springform pan with parchment paper. Coat paper and sides of pan with nonstick cooking spray.

In a large bowl, beat cream cheese and sugar until smooth. Beat in sour cream and vanilla until mixed thoroughly. Add one egg at a time, mixing on low between each one just until all three eggs are incorporated. Pour mixture into springform pan and place on a baking sheet in the oven.
Bake for 45-50 minutes or until cheesecake is golden brown and not jiggly.
Take out of oven and let pan cool on rack for 10-15minutes. Run a knife along the edge of the pan to loosen up the cheesecake. Let cool for another 30 minutes on counter then move to refrigerator to chill and set up for no less than 4 hours. Can freeze or refrigerate over night.

Remove cheesecake from refrigerator (if frozen let thaw for 30 minutes). Place graham cracker crumbs in shallow dish. Scoop out 1 inch balls and roll into graham cracker crumbs and place on wax or parchment paper covered baking sheet. After all the balls are scooped our and rolled in crumbs then you can place the baking sheet of balls into freezer to set up for 1 hour.

In a microwave safe bowl, melt the white chocolate chips and shortening in 15 second intervals, stirring in between each until all the chocolate is melted. Place your toppings and add ons in bowls for decorating. Using a small fork or spoon, dip the balls into the white chocolate and make sure the whole ball gets coated in chocolate and place on baking sheet and immediately add your sprinkles or toppings to the balls while the chocolate is still warm. The chocolate cools quickly on the cold balls and if you wait too long the toppings won't stick. After all of the cheesecake balls are coated and decorated, place the sheet back into the freezer for about 15-20 minutes to chill the balls one more time.

Okay. Now you can eat one. HALLELUJAH!!! Delish! I know.
Find someone special to share these divine little desserts with. Someone will be very impressed.
You will have the satisfaction of knowing that all that hard labor intensive work wasn't for nothing.
I hope you enjoyed making these. Remember, moderation is key.
Most importantly, enjoy your journey in the kitchen.
Blessings,


Monday, April 14, 2014

How to make a basic Cheesecake from scratch

It seems like a lot of people are intimidated when it comes to tackling a cheesecake from scratch. So they go to the store and buy one or grab a box of instant cheesecake mix, which does not compare to the real thing. I used to do that too, before I learned how to make one at home. It is a lot easier than you might think. There are however a few extra steps than the normal baking recipes, but nothing you can't handle and totally worth it.  The hardest part is waiting for it to set up in the fridge before you get to devour it. The first time may be a little daunting but once you have made it once, you will never buy a store bought cheesecake again.

What you will need:
Gadgets:
Large Mixing bowl
Silicone spatula
hand mixer, stand mixer or your husbands muscles (options)
12" Spring Form Pan
Measuring spoons
Large deep roasting pan or it's equivalent
Large Pot to boil water
Foil (Like 2 baking sheet size pieces)

Ingredients:
CRUST
2 cups finely crushed graham cracker crumbs
1/4 cup (4 tbsp.) melted butter
1/4 cup granulated sugar

FILLING
4-8oz packages Cream Cheese (room temp)
1 1/4 cup granulated sugar
4 large eggs (room temp)
1 tbsp. good quality Vanilla Extract
1 tbsp. Fresh Lemon juice (you can use the bottled too)
2 tbsp. heavy cream


Bakes: 40-50 minutes @ 350degrees

First, preheat your oven to 350degrees.
Next, use that big sheet of foil and tightly wrap it around the outside of your springform pan and tuck it just under the lip around the outside of the pan, making sure that the entire outside of pan is wrapped, like so...
 
Next, go ahead and fill your pot or sauce pan with about roughly 4 cups of water and allow that to come to a boil on the stove. (The amount of water you need will vary depending on the size of roast pan you are using.) You want the water to come up halfway on the pan. This is all for the Water Bath, which comes later. Yes, you read that correctly.

Meanwhile, while the water is boiling and oven is preheating, Let's make the crust. Pour graham cracker crumbs, 1/4c sugar and 1/4c melted butter into the bottom of the springform pan and use your hands to thoroughly combine all the ingredients into a crumbly moist mess and then begin to flatten the crumbs into the bottom of the pan with the palm of your hand and flats of fingers and work it out to the edges to create a flat tight even layer on the bottom. If you want to work some of the crumbs up the inside walls of the pan to make a higher edge crust, you can. I only go up a little bit. enough to make a lip. Now put your pan of firmly packed crumbs into the oven and bake for 10 minutes. When it's time, take out and allow to cool on counter.
While the crust is baking, you can start to mix the filling.
First, use the mixer to cream the cream cheese until it is fluffy, creamy and lump free. Next you can add the sugar, vanilla, lemon juice and heavy cream. Mix until smooth.

Then add one egg at a time, blending between each one until all four eggs are incorporated into the mixture.
Use your rubber or silicon spatula to mix the mixture together by hand, making sure to scrape down the edges and bottom for any cream cheese that may not have been mixed in good enough. If you have that problem, just use the mixer to give another quick mix. Then it is time to pour the mixture into our cooled pan of crust.
Use the silicon spatula to push the mixture to the edges of the pan and even it out until it is flat and smooth, like so...


 Now that your cheesecake looks all smooth and yummy, we have to bake it. Place the pan in the bottom of your large roasting pan. This is what I use...
Next, it's time for the water bath. Using this method helps the cheesecake to cook more evenly as well as keeps the cheesecake super moist by creating a lovely little steam bath for it, which in return helps to keep the cheesecake from cracking. Nobody likes a cracked cheesecake. Put the whole thing in the oven on the middle rack and pull the rack out just a little , so you don't burn yourself, but not too much. Pour the boiling water into the roast pan and around the outside of the cheesecake. Paying attention not to get any water in the cheesecake.  Gently and slowly side the rack with the pan back into the oven and bake for 40 - 50 minutes. Start checking at 40 minutes. The cheesecake should not jiggle when you nudge the outside of the pan. It should be mostly firm with a nice light golden brown coloring to the top.
Take out the whole pan and set on some hot pads. As soon as the foil on the cheesecake is cool enough to touch, slowly peel back the foil from the outside of the pan and put pan onto a cooling rack. You don't want the cheesecake to sit in the hot water any longer than it has too. Using a clean pairing knife, slide it around the outside of the cheesecake along the wall of the pan to free it up before you take off the outer part of the pan.
Once you went around it once or twice, you can unfasten the outside of the pan and gently lift off and over the cheesecake. Allow to cool on the counter for about 20-30 more minutes, then transfer to the fridge to cool for at least 4 hours.
Waiting sucks!!!  

Once the time has passed and the cheesecake is firm and cold, you can slice it up and serve it up. try fresh berries or a strawberry puree to go with it.
I hope that you try this recipe out and find out for yourself how easy it is to bake and share it with your friends. Nobody minds when you roll up with a few slices of freshly home-baked cheesecake.
Enjoy your journey in the kitchen. Blessings!!!


Friday, April 4, 2014

Warm Apple Crisp: Simple & Delicious Recipe

Warm Delicious Apple Crisp
If you love apple pie but don't always have the time to make one from scratch, then you will love this easy and delicious recipe for Apple Crisp. I got this recipe from my grandmother. However, I cannot say for sure where she got it from. Probably one of the ladies from her church. They love to trade recipes. So let's get started.
You will need:
4 large granny smith apples (8 small)
1 stick of room temp butter (save the butter wrapper)
1c. flour
1c. sugar
1 tsp. cinnamon
1 tbsp. lemon juice
1/2c. pecans (optional)

Gadgets: Kitchen Knife, Potato Peeler, Medium Baking Dish, Mixing Bowls, Measuring Spoons, Mixing Spoon, Baking Sheet

Bakes: 40-45 minutes

Let's do this:
Preheat your oven to 350F.
Next you want to peel your apples. I don't think anybody really likes to peel apples. So I find that using a potato peeler for this is the easiest and quickest way to get the job done. (Save those peels and cores if you have a compost for your garden)
Then you want to slice your apples into slices. You don't want to make them too big that it will take to long to cook, but you also will not want them too small or it could make the crisp more like an apple sauce. (You've been warned)
Put your sliced apples into a large bowl and sprinkle with the lemon juice. The lemon juice helps to keep the apples from turning brown and helps to bring out the tart flavor of those crispy apples.. I also like to sprinkle a tablespoon or two of sugar and a dash of cinnamon onto my apple slices before I add the topping. This is totally optional and does not need it. I just like SUGAR. Set apples aside.

Now let's make that crumble. In another mixing bowl you will mix the butter, flour, sugar and cinnamon, with your hands. Go ahead and get in there. It's therapeutic. It actually is just the best way to get everything incorporated together. If you chose to go the pecan route then this is when you want to add them. Use your hands again. It's nice!

Now let's put this baby together and get it in the oven. You were probably wondering what the butter wrapper was for? Use the butter covered paper to smear all over the inside of your baking dish. It keeps the sugar and crumble from sticking to much. Good idea, right?

Okay, fill the baking dish with the apples and then use your hands again to sprinkle to crumble mixture over all the apples. Make sure that everything gets covered with the crumble.
We're ready to bake. I like to place the baking dish on a baking sheet just in case. Slide it in the preheated oven, set the timer to 40 minutes and read a book or have a coffee. It takes longer if you linger. Check the crisp when the timer goes off. I use a paring knife and slide it into the middle of the crisp and make sure that the apples are done and not still hard. The knife should slide through easily. If they aren't done all the way then you can bake it for another 5-10 minutes, checking every 5 minutes.

When the crumble is done and apples are soft then take it out of the oven and let it cool on a cooling rack for about 10 minutes. Just long enough to make some homemade delicious whipped cream, if you are into that sort of thing. You can buy some but I prefer to make my own. It's easy.

Whipped Cream:    

1c chilled heavy cream
1/4c. confectioners sugar
1 tsp. vanilla extract      

Pour cream into mixing bowl and beat with mixer at medium spread or by hand for 2-3minutes or until the cream starts to thicken. Add the powdered sugar and vanilla extract and mix again until the sugar is well blended and the whipped cream has a thick fluffy consistency and forms stiff peaks.
That's it. Chill until ready to eat. If it makes it to the fridge. Sometimes it doesn't.

Enjoy your journey in the kitchen. Share with a friend. Blessings